本文共 9445 字,大约阅读时间需要 31 分钟。
wordpress插件
, I explained a fast way to quickly add shortcodes to a WordPress site. But, sometimes you need more than a quick-fix, stop-gap solution like shortcodes. That’s where the more powerful option of plugins come into play.
,我解释了一种快速将简码添加到WordPress网站的快速方法。 但是,有时您需要的不只是快速解决,权宜之计的解决方案,例如简码。 这就是更强大的插件选项发挥作用的地方。
Creating plugins can be incredibly intimidating, though. The first one I made took me a solid day of research, trial and error, and hair-pulling “fun.” But, once I had the plugin in place, it made development so much easier.
但是,创建插件可能令人难以置信。 我做的第一个工作使我度过了坚实的一天,这是研究,反复试验和拔头发的“乐趣”。 但是,一旦有了该插件,它就使开发变得非常容易。
More importantly, plugins are relatively safe from clients breaking your WordPress efforts when they run those automatic WordPress updates, upgrade their theme, or even change themes entirely. If you’re looking for a permanent solution to a WordPress design demand, plugins are the answer.
更重要的是,当客户端运行WordPress的这些自动更新,升级主题甚至完全更改主题时,插件相对安全,可以防止客户端破坏WordPress的工作。 如果您正在寻找针对WordPress设计需求的永久解决方案,那么插件就是答案。
The lazy way to add functionality is to just open up the functions.php file and start adding your code. But, this is destined to get broken. If you’re not directly managing the site, someone is going to get in there and break something. It’s just the way curious clients work, it seems.
懒惰地添加功能的方法是只打开functions.php文件并开始添加代码。 但是,这注定要被打破。 如果您不是直接管理站点,则有人会进入那里破坏某些东西。 看来,这只是好奇的客户的工作方式。
So, creating a WordPress plugin gives you the safety of a near-permanent solution (clients have been known to uninstall plugins for some unknown reason). Short of a WordPress upgrade that makes your code obsolete, you don’t have to worry about your new functionality disappearing or getting overwritten.
因此,创建WordPress插件可以为您提供永久解决方案的安全性(已知客户端会出于某些未知原因卸载插件)。 无需进行WordPress升级即可使您的代码过时,您不必担心新功能消失或被覆盖。
步骤1:创建您的插件文件 (Step 1: Create Your Plugin File)
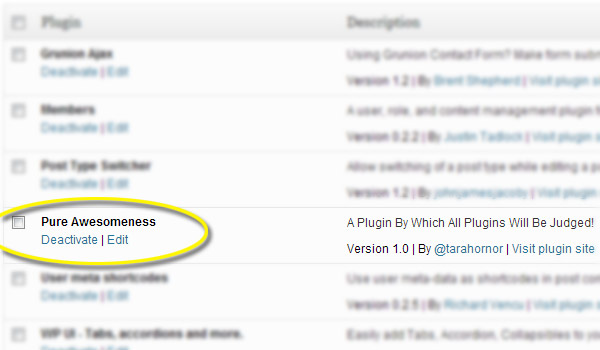
This is the first and most important point of the process — and actually way easier than most people realize. To demonstrate just how simple creating a plugin can be, here’s a useless plugin that you can write and install by simply copying and pasting this code and uploading it to your site. It doesn’t do anything, but it does properly register and install the plugin with this little bit of code:
这是该过程的第一个也是最重要的一点-实际上比较容易的方式比大多数人意识到。 为了演示创建插件的简单性,这里有一个无用的插件,您可以通过简单地复制和粘贴此代码并将其上传到您的站点来编写和安装。 它没有执行任何操作,但是使用以下代码可以正确注册并安装插件:
[sourcecode language=”php”]
[源代码语言=“ php”]
<?php
<?php
/*
/ *
Plugin Name: Pure Awesomeness
插件名称:Pure Awesomeness
Plugin URI: http://www.yoursite.com/pure-awesomeness
插件URI:http://www.yoursite.com/pure-awesomeness
Description: A Plugin By Which All Plugins Will Be Judged!
说明:一个可以判断所有插件的插件!
Version: 1.0
版本:1.0
Author: @tarahornor
作者:@tarahornor
Author URI: http://www.yoursite.com
作者URI:http://www.yoursite.com
License: GPLv3
许可证:GPLv3
*/
* /
?>
?>
[/sourcecode]
[/源代码]
Try it! Save the above code into a file called awesome.php and upload it in your “Plugins” > “Add New” page within your WordPress site. You’ll get the activation confirmation and you’re done! Now it shows up as one of your installed WordPress plugins…even though it doesn’t do anything useful yet.
试试吧! 将以上代码保存到名为awesome.php的文件中,并将其上传到WordPress网站中的“插件”>“添加新”页面中。 您将获得激活确认,然后完成! 现在,它显示为已安装的WordPress插件之一……尽管它并没有做任何有用的事情。
Note: You may have to compress the file into a zip folder first, depending upon your version of WordPress.
注意:您可能必须首先将文件压缩到zip文件夹中,具体取决于您的WordPress版本。
Now, like I said, this plugin doesn’t do anything yet, so let’s look at how we can get WordPress to actually start doing something useful with our newly-created plugin.
现在,就像我说的那样,这个插件还没有做任何事情,所以让我们看一下如何让WordPress真正开始使用我们新创建的插件做一些有用的事情。
步骤2:初始化功能 (Step 2: Initializing a Function)
With a fully-registered plugin, you can now start telling WordPress about the functions that you create. To do this, we use the built-in initialize feature. Just add the following below your code:
使用完全注册的插件,您现在可以开始将创建的功能告诉WordPress。 为此,我们使用内置的初始化功能。 只需在代码下面添加以下内容:
[sourcecode language=”php”]
[源代码语言=“ php”]
add_action(‘init’, ‘pure_awesomeness’);
add_action('init','pure_awesomeness');
function pure_awesomeness() {
函数pure_awesomeness(){
//some code here
//一些代码
}
}
[/sourcecode]
[/源代码]
Again, we’re doing anything just yet, but if you’ve ever written in PHP, you should start getting excited at this point. Once you have PHP functions, you can do anything! But, it’s not as easy to get WordPress to start processing our functions.
再说一次,我们仍在做任何事情,但是,如果您曾经用PHP编写过,此时您应该开始感到兴奋。 一旦有了PHP函数,就可以做任何事情 ! 但是,让WordPress开始处理我们的功能并不容易。
I could stop there, but I want to give you some tools you can use to start building on this ultra-simple plugin. The above code isn’t anything, really. Plugins give you the ability to create powerful functionality by linking lots of files and other content into your plugin, but it’s not exactly intuitive.
我可以在这里停下来,但是我想为您提供一些工具,您可以使用这些工具开始在这个超简单的插件上构建。 上面的代码实际上没有任何内容。 插件使您可以通过将大量文件和其他内容链接到插件中来创建强大的功能,但这并不十分直观。
步骤3:链接文件(可选) (Step 3: Link Files (Optional))
If you do any kind of web development, you’re going to want to break your functionality up into multiple files. Forms, CSS, and images would all be prime examples of separate files that you may want to reference.
如果您进行任何类型的Web开发,您将需要将功能分解为多个文件。 表单,CSS和图像都是您可能要引用的单独文件的主要示例。
To link additional files, use the WordPress include function:
要链接其他文件,请使用WordPress包含功能:
[sourcecode language=”php”]
[源代码语言=“ php”]
include( plugin_dir_path( __FILE__ ) . ‘pure-awesome-functions.php’);
include(plugin_dir_path(__FILE__)。'pure-awesome-functions.php');
[/sourcecode]
[/源代码]
The file we linked to could contain anything — additional functions, forms, etc. Any functions in your included files are now available for you to call whenever you need them!
我们链接到的文件可以包含任何内容-附加函数,表单等。现在,包含在文件中的任何函数都可以在您需要时调用它们!
步骤4:将CSS放入队列(可选) (Step 4: Enqueue CSS (Optional))
Another piece of the plugin puzzle that you may want to implement could be CSS. Whether you are styling your own functions or adding styles to the existing WordPress theme, you must first register the CSS, which WordPress refers to as enqueuing — one of the least intuitive words ever.
您可能要实现的插件难题的另一部分可能是CSS。 无论您是在设计自己的函数样式还是在现有的WordPress主题中添加样式,都必须首先注册CSS,WordPress将该CSS称为排队-这是有史以来最不直观的单词之一 。
The enqueue process takes four steps:
入队过程分为四个步骤:
- add_action add_action
- create a function 创建一个功能
- register the CSS 注册CSS
- enqueue the CSS 排队CSS
Sound like a pain? Yep. But that’s the process and here’s what it looks like in code:
听起来像痛苦吗? 是的 但这就是过程,这就是代码中的样子:
[sourcecode language=”php”]
[源代码语言=“ php”]
add_action( ‘wp_enqueue_scripts’, ‘pure_awesome_stylesheet’ );
add_action('wp_enqueue_scripts','pure_awesome_stylesheet');
function pure_awesome_stylesheet() {
函数pure_awesome_stylesheet(){
wp_register_style( ‘pure-awesome-style’, plugins_url(‘css/cpure-awesome-styles.css’, __FILE__), array() );
wp_register_style('pure-awesome-style',plugins_url('css / cpure-awesome-styles.css',__FILE__),array());
wp_enqueue_style( ‘pure-awesome-style’ );
wp_enqueue_style('pure-awesome-style');
}
}
[/sourcecode]
[/源代码]
A point worth mentioning here is that the CSS file is relative to the location of the file in which you are calling the CSS. In the above example, I am pointing to a CSS folder. This folder would be protected from clients and core updates within the plugin directory.
这里值得一提的是CSS文件相对于您在其中调用CSS的文件的位置。 在上面的示例中,我指向一个CSS文件夹。 该文件夹将受到保护,免受插件目录中的客户端和核心更新的影响。
Let’s step back and look at what’s happening. First we use the add_action to tell WordPress that we’re about to enqueue a script — this could be a PHP file, CSS, or something else. The next argument in the add_action feature is the name of the function that we want to call.
让我们退后一步,看看发生了什么。 首先,我们使用add_action告诉WordPress我们即将加入脚本-这可以是PHP文件,CSS或其他东西。 add_action功能中的下一个参数是我们要调用的函数的名称。
Next, we create the function. This is required for actually doing the work of registering and enqueuing the file.
接下来,我们创建函数。 这是实际完成注册和排队文件的工作所必需的。
The wp_register_style simply points to the file location of the CSS file and gives it a short name.
wp_register_style只是指向CSS文件的文件位置,并给它起一个短名称。
Lastly, the wp_enqueue_style function actually registers the style with WordPress, making it ready to access. You’ll see the CSS file in the <head> section of the site’s source code now.
最后,wp_enqueue_style函数实际上在WordPress中注册了样式,使其可以访问了。 现在,您将在站点源代码的<head>部分中看到CSS文件。
步骤5:添加简码(可选) (Step 5: Add Shortcodes (Optional))
Another feature you may want to take advantage of with plugins are the ability to . Using the above include call (from Step 3), you can write any number of functions. If you want to use the function as a shortcode, all you have to do is use the technique in Step 3 to link to the file where your functions live, and then add the following:
插件可能需要利用的另一个功能是能够 。 使用上面的include调用(从第3步开始),您可以编写任意数量的函数。 如果要将该函数用作简码,则只需使用第3步中的技术链接到函数所在的文件,然后添加以下内容:
[sourcecode language=”php”]
[源代码语言=“ php”]
add_shortcode( pure_awesome_shortcode’, ‘pure_awesome_function’ );
add_shortcode(pure_awesome_shortcode','pure_awesome_function');
[/sourcecode]
[/源代码]
Put the name of the shortcode as the first argument and the name of the function you want to call as the second argument.
将简码的名称作为第一个参数,将要调用的函数的名称作为第二个参数。
Of course, there are lots of other things to learn about plugins, but hopefully this will give you the confidence to get started by creating your own today and learning as you go.
当然,关于插件还有很多其他的事情要学习,但是希望这会让您有信心开始创建自己的插件并随手学习。
Good luck and have fun!
祝好运并玩得开心点!
翻译自:
wordpress插件
转载地址:http://zdrgb.baihongyu.com/